Saturday, December 20, 2014

XML Bursting Example

Background / Business Requirement for Bursting
In Oracle Purchasing we have PO Print Report which can be used to print new or selected Purchase order. Organizations usually schedule this program on a daily basis to print new purchase orders. If we want to integrate this Oracle Report to XML/BI Publisher to create eye candy layouts and email the PO automatically to the suppliers, the common issue we face is :-
How to split the XML file created by report ? This is because report will create a single XML file consisting of the all the PO selected and if we apply the template on this XML file , it will create a single PDF file consisting of all the PO’s , and we definitely don’t want purchase orders sent to a supplier which is not related to him .If we have to send PO to individual supplier there has to be a way to parse the XML file generated from the PO Print Report.After parsing the XML file we can break the XML into smaller chunks based on the PO Number and then email the PO to respective Suppliers.


Advantages of XMLP bursting

a. No Additional Coding, just need to create XML bursting File. ( Isn't it exciting , otherwise we would have to write java program to split the XML File and then use XMLP delivery manager API to send emails .
b. Process of Creating XML data Definition and Template remains AS – IS .

Prerequisites
a. Apply patch 5968876 if not already applied
b. Verify XMLP version is 5.6.3

Steps to Verify if XMLP is indeed 5.6.3

1. adident Header $OA_JAVA/oracle/apps/xdo/common/MetaInfo.class

Below matrix shows the the version you are and the patch to be applied to come to 5.6.3

Metainfo.class


Metainfo.class
XML Publisher
Patch Reference
120.6 XDO 5.6.3 Patch 4440000 
... for the Oracle E-Business Suite 11i   
115.28XDO 5.6.3 Patch 5472959 Note 422508.1
115.27XDO 5.6.2 (core) Patch 5097966 Note 367394.1
115.26 XDO 5.6.1Patch 4905678 Note 357308.1
115.24XDO 5.6.0 Patch 4561451Note 337999.1
115.22XDO 5.5.0 Patch 4206181 Note 316447.1
115.21XDO 5.0.1 (core) Patch 4236958  
115.19XDO 5.0.0 Patch 3822219 Note 295036.1


c. Set Temporary Directory in the XML Publisher Administrator- > Administration- > General to a directory to which you have write permission .

d. After the Patch is applied we will see a new Bursting control file button in the XML Publisher Data Definition Page
To check this, please go to Responsibility "XML Publisher Administrator", and search for any existing report, and click on Update. While updating an existing data-definition, you should see the button Bursting Control File.
Now since we have finished setting up , now we will see how to implement Bursting . The major component in this is bursting control file


What is a bursting file ?

Its an XML file which tells bursting engine


a) How to split the XML File created ?

b) How to deliver the Documents ?


Lets see a sample bursting file and its components


a) tag tells busting engine , bursting should be done at the occurrence of which tag ?
b) tag tells bursting engine , which delivery mechanism to be used and on what condition ?

Sample bursting file


xxp@xx.org.uk
" reply-to="xx@xx.org.uk">
Please review the attached PO ${POH_PO_NUM}


Please Note : While doing testing please change the "to address" to your email address , else it will send the documents out to that email address .
Data Definition
Create the Data Definition and Template the normal way, where the Short name of the data definition is same as the short name of concurrent program to which you are integrating XMLP.While creating Data Definition Upload you bursting XML File . If there are any parsing issues in the XML file it will give error , please correct the format of the file and try to upload again .


Template File
Create the Template and Upload your Template file


Concurrent Program Registeration

In the Concurrent Program give the Output fomat as XML and the Concurrent Program Short name should be same as the data definition name .


After Report Trigger Changes
Now the Final Step , in the After report Trigger of your .RDf add the following code to call bursting program . This will lanuch the bursting program from your report , otherwise you will have to run the Bursting program ( which is a Java Concurrent Program ) manually .


Now you are all set to do the testing , run the report , please keep in mind to change "to email address" in the bursting control file to your email id while doing the testing . you will see the PO pdf coming to the email address given in the bursting control file.

How to install new font using XML Publisher Administrator

any of you will have seen the Administrator module on the Template manager in the E Business Suite ... the new properties UI is great and much easier to use but you can now also manage those troublesome MICR, Barcode and other fonts through the manager too.

Thanks to Kevin McDermott from Oracle Support for laying out the following very useful instructions:

XML Publisher 5.6 has a new tab: Administration. This replaces the xdo.cfg configuration file. Now fonts can be uploaded and stored in the database instead of stored on the file system.

Under the Administration tab are sub tabs: Configuration, Font Mappings and Font Files and Currencies.

To install a font requires only a few steps.

1. Log in as XML Publisher Administrator.

2. Navigate to Administration->Font Files->Create Font File.

3. Fields are Font Name and File.
       For Font Name choose any descriptive name.
       File will browse your PC to locate the font file.

4. Navigate to Font Mappings->Create Font Mapping Set.

5. Mapping name is the name you will give to a set of fonts.

6. Mapping code is the internal name you will give to this set.

7. Type: 'PDF Form' for PDF templates. 'FO to PDF' for all other template types.

8. Create Font Mapping (this allows you to add multiple fonts to a set).

9. Font Family is the exact same name you see in Word under Fonts.
If you don't use the same name the font will not be picked up at runtime.

10. Style and weight must also match how you use the font in windows.
Normal and Normal are good defaults.

12. Navigate to Configuration General-> FO Processing->Font Mapping Set.
Can also be done at data def and template level under Edit Configuration.
Hierarchy is Site-> Data Def -> Template.

13. Select your new mapping set.

14. Make sure the font is not referenced under File->Properties->Custom in the RTF template file.

15. Upload a template that uses your special font and test using preview.

Excel Template for building BI Publisher Report

Excel Template Report:
Most of the people knows that XML Publisher Report can only be build using RTF File. However, latest version of BI Publisher 11.1.15 onward has flexibility to create XML Publisher Report in Excel too.
Advantages: a) If one of your client ask you to develop a XML Publisher report in multi-tab excel format, we generally say that it is not possible using XML Publisher. But now, it is possible using Excel Template Report.
b) If one of your client ask you to prepare a XML Publisher report where formulas should be visible as like in Excel,  we generally say that it is not possible using XML Publisher. But now, it is possible using Excel Template Report.
c) Splitting of Data into multiple tabs based on conditions
d) Split hierarchical data across multiple sheets and dynamically name the sheets
e) Create sheets of data that have master-detail relationships
f)  Use native Excel functionality
Disadvantages: a) RTF Report is easy to design in comparison with Excel Template Report.
b) RTF Report is easy to debug in comparison with Excel Template Report.
The steps
In order to design the template, we need a template builder for Excel which is installed automatically when you install the BI Publisher Desktop plug-in. Here are the 10 simple steps to create an XLS template.
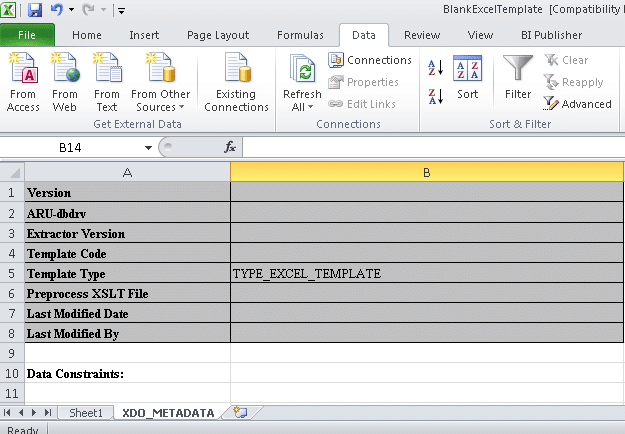
1. Get the ‘BlankExcelTemplate’ from the sample Excel template which comes along with your desktop tool and save it with the name you prefer. XDO_METADATA sheet is required for BIP to process the template and add calculations. Hide this sheet before you attach the template.
sbblog_xlsbip1

2. Obtain the XML data file and identify the columns you want to display on your excel report.
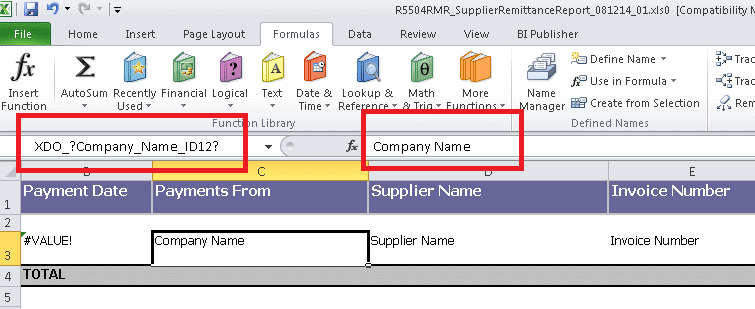
3. To map the XML element in excel, we should enter the prefix XDO_? then followed by element name in the name box. For example, ‘ XDO_?Company_Name_ID12?’
4. Select the cell and enter the XML element in the name box with XDO_ prefix and enter the name of the cell in the formula bar to display text on the template then press enter.
sbblog_xlsbip2
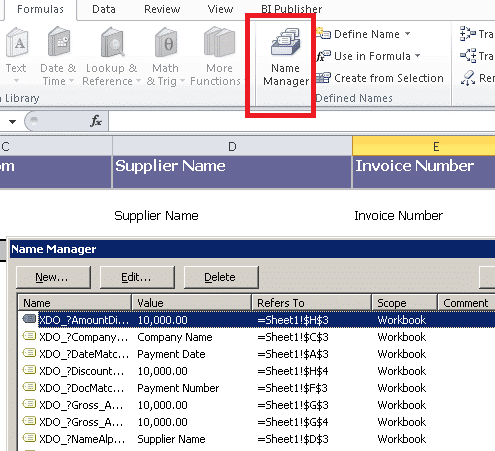
5. Repeat the above step for remaining columns. After entering all columns, all the names will appear as shown below in Name Manger dialog box.
sbblog_xlsbip3

6. To add calculations for example, total the gross amount for each payment date, we have to define the name in the name box by selecting the cell. Total_Gross is the name defined here.
sbblog_xlsbip4

7. Once the name is defined for the calculation, add the calculation in the XDO_METADATA sheet as shown below.
sbblog_xlsbip5

8. To create group in the template like ‘for each’ in the word template, select the cells you want to repeat and enter the XML element name with the prefix XDO_GROUP_ in name box. In this example, On_Payment_ID_Internal is the level break header where we display one record for each payment.
sbblog_xlsbip6

9. In order to repeat the section for each payment date, select the rows 1, 2, 3 and 4 then enter the element name with prefix XDO_GROUP_. In the example, On_Check_Item_Date_S11 is the level break header.
sbblog_xlsbip7

10. XML file produces the date in YYYY-MM-DD format by default. In order to display the date in MM-DD-YYYY format, use the DATEVALUE function after mapping the original date element. In this example, date is mapped to column A (hidden) and used function to display the date based on column A.
sbblog_xlsbip8
Limitations:
  1. The template must be saved as Excel 97-2003 as *.xls.
  1. All tags must be manually coded, there is no tool available.
  1. Can’t burst the xls template.

XML Publisher Tips

1) ‘IF ELSE’ condition in XML publisher 
XML Publisher supports the common programming construct “if-then-else”. This is extremely useful when you need to test a condition and conditionally show a result. For example:
IF X=0 THEN
Y=2
ELSE
Y=3
END IF
You can also nest these statements as follows:
IF X=0 THEN
Y=2
ELSE
IF X=1 THEN
Y=10
ELSE Y=100
END IF
Use the following syntax to construct an if-then-else statement in your RTF template:
For example, the following statement tests the AMOUNT element value. If the value is greater than 1000, show the word “Higher”; if it is less than 1000, show the word “Lower”; if it is equal to 1000, show “Equal”:
1000 then 'Higher'
if AMOUNT < 1000 then 'Lower'
Else

'Equal'
end if?>


  2) How to get SYSDATE in the header section dynamically when we run the report
You cannot insert form fields in the Header section, but you can just insert the code to achieve this. For example: insert this in the header section to view the sysdate: You could format the date as you would like..

 3)  What are the XML publisher tables?
 PER_GB_XDO_TEMPLATES
XDO_DS_DEFINITIONS_B
XDO_DS_DEFINITIONS_TL
XDO_DS_DEFINITIONS_VL
XDO_LOBS
XDO_TEMPLATES_B
XDO_TEMPLATES_TL

XDO_TEMPLATES_VL
XDO_TEMPLATE_FIELDS
XDO_TRANS_UNITS
XDO_TRANS_UNIT_PROPS
XDO_TRANS_UNIT_VALUES
4) How to write a loop in rtf template design?
     ……………………..
5)  How to design sub templates in rtf layout?
Using following tags..
  
          This is Last Page
                            
6)  How to call a header or footer?
Using this tag
  and
    We have to use header section and footer section of the page.
7)  How to break the page in specific condition?
8)  How to use section break?
9)  How to create multi layouts in XMLP?
          
            Your template….
          
                   
                   Your template….
                   
                        
                         Your template….
                       
10) How to submit a layout in the backend?
we have to write a procedure for this using the below code
FND_REQUEST.ADD_LAYOUT                         (     TEMPLATE_APPL_NAME      => 'application name',
TEMPLATE_CODE           => 'your template code',
TEMPLATE_LANGUAGE       => 'En',
TEMPLATE_TERRITORY      => 'US',
OUTPUT_FORMAT           => 'PDF'
);
11) How to display the images in XMLP?
url:{'http://image location'}
                 For example, enter:
                   url:{'http://www.oracle.com/images/ora_log.gif'}
                      url:{'${OA_MEDIA}/image name'}
12) How to pass the page numbers in rtf layout?
200<\PAGESTART>
....
13)  Printing Report Parameters
In report, we need to print Report Parameters and might need to use it multiple times. To declare the parameter, create new field at beginning of the report with help text
. Create one more new field with help text to print wherever parameter needs to be printed.

For example, assume P_EMPLOYEE_NAME is one of the report parameter. To use that in RTF, create new filed named P_EMP_NAME with help text
. To print this parameter value create one more new field with name as help text.
14. Fit into single pageOracle Report Layout has “Fit to Page” property. If we set this to “Yes” then if the page is not enough to fit the content then entire content will be printed in next page. This is known and wildly used property. Is this possible in RTF Template?

Yes. First identify contents that need to fit into a page. Insert a table with only one row and column. Keep the identified contents inside this table. Select Table Property. Navigate to “Row” tab. Uncheck “Allow Row to break across Pages’ check box if it is checked. This will make sure the contents won’t split across pages.
15. Font Support
You might have noticed some time Report Output won’t match with RFT Template Font. This is because PDF Engine will support only specific fonts. If you use fonts that are not supported by PDF Engine then engine will use it is default font. So try to use fonts that are PDF engine supports.

Some time we have to use specific fonts that PDF engine didn’t support. Best example is company name, logo etc. Mostly we use these in report headers. Simple workaround is copy the logo or name or any text that we want it in specific font. Convert into to image and use that image wherever we need. Of course it will affect the performance if we use too many images in a template.
  

Order Details Workflow

To process an Order in 11i, Order Management uses internal Workflow technology.

image

As you can see it contains a start activity and an end activity and bunch of other activities in between.
11i Order Management primarily uses two workflow processes two process a Sales Order. One for processing an header and the other one for processing lines. Depending on our requirement we will configure these workflow processes to send out an event at appropriate steps within the processing. To configure an event there is a standard activity, Event activity, which we will embed and populate it with relevant data.
Let’s look at a Header processing workflow. How do I get to it. Well in 11i most of the functionality is inside the database. Workflow technology is also implemented as a PL/SQL engine inside the database. These processes are executed at runtime by this engine. The picture that you saw above is a design time tool and can be run from your desktop. All the relevant files are stored as “wft” file extensions. As you can imagine now …these are loaded into database for execution.
So let’s pull the header workflow by connecting to the 11i database.

image

There are bunch of processes listed here. For header processing we have “R_STANDARD_HEADER”. This is what is shipped out of the box from 11i. Of course customers have the option of creating their own and customize it to their needs.
image
image

As you can see in the above workflow there is a standard “Start”, called as “Enter”, and an “End” activity. Besides this we have “Book Order, Manual” and “Close Order” activities. Let’s focus on “Book” and “Close” activity. Picture of these activities indicates that they invoke sub processes.

Booking Order Process

A Sales Order can be entered through the Sales Order form or it can be received from external systems through various order channels like web sites, EDI or  XML. When they enter the Order management system they are in a status called as “Entered”. Next step in the Order processing cycle is to book the order. Normally you enter into Order Management’s Order Form and click on the button “Book”. Above mentioned workflow get’s triggered as a result of that.

Configuring Oracle Workflow

Let’s say we want to send the Order status to external system’s when the order is Booked. So let’s see if there is any event available out of the box. To do this we can browse through 11i Event’s screen by selecting responsibility “Workflow Administrator Web Applications” and clicking on “Administrator  Workflow'” ---> “Business Events”. Give the search criterion as “oracle.apps.ont”. Here “ont” is the internal code for Order management module and “oracle.apps” is a standard used for all events shipped out of the box by 11i.

image

Alternatively you can browse the same through E-Business Suite adapter from Oracle BPEL or Oracle ESB.

image

Both of the approaches gives the same view.

Looking at the what is being shipped out its very clear that there is no event which  get’s triggered when Order is booked….OK…hum… what needs to be done in order to inform external systems, UI’s etc when Order Booking happens. Here are the steps…
  • Define a custom business event
  • Insert a new “Events” activity in the Workflow
  • Configure the activity
  • Optionally….insert another custom activity to populate additional data
Let’s go through each of the above in detail.

Define a custom Business Event

Log into Oracle apps as “sysadmin/sysadmin”. Select the responsibility “Workflow Administrator Web Applications” and clicking on “Administrator  Workflow'” ---> “Business Events”.

image

You can see “Create Event” button click on it to define the event and input the details as in the screen

image

Insert a new “Events” activity in the Workflow

In the 11i workflow builder look at the toolbar. You will notice there is an event activity. Drag and drop that in the Workflow panel


image


image

Your workflow so far looks like this

image

Configure the activity

Click on “Event Details” tab. Make sure you put the Event Name value as “oracle.apps.fnd.order_booked”. Another required value to raise the event is “Event Key”. This has to be a unique value. In our case we can map this to Order Header ID which is always unique.

image 

Optionally you can define the variables that you want to pass as a part of the event. Map these variables through the “Node Attributes” tab
In the following diagram I have defined variables (Activity Attributes) starting with name as “X”. For example in this scenario when a Order Booked event is raised we want to know following
Order Number, Customer PO Number, Organization ID and Order Header ID

image

And map these variables from the “Node Attributes” tab.

image

Well in this scenario most of the data that we want is not available as pre-defined variables….but don’t worry its quite easy to get exactly what data you want to populate. So what we will do is define additional variables for the workflow and populate them through a custom PL/SQL program and then map them through the Event we created.

Custom activity to populate additional data

Check additional data you need …is that already available in the Workflow variables. If yes… good…otherwise create the required variables. In following diagram I have created additional variables starting with name as “XX_”

image

We have defined new variables for the workflow…now let’s populate them through the custom PL/SQL activity. Go back to our wonderful 11i Workflow builder and click on Function activity….drag it and drop it on the panel…

image

Function activity will prompt for input parameters. Most important one is the name of PL/SQL program that gets called from here….In this case it’s “XX_GET_ORD_DETAILS”

image


Your workflow now looks like following

image
To summarize what we did.
Created a custom event called as “XX_ORDERED_BOOKED_EVENT”. We created some additional attributes to pass some custom data…this is optional….Created a custom PL/SQL function activity “XX_GET_ORERE_DETAILS” to populate the additional variables in the custom event.